January Host Code – ZHHWMNHQ

Here’s how the Host Code works.
1.  Visit my 24/7 Shop
2.  Place an order (if it’s over Β£150, then you become the Host and get the Stampin’ Rewards, so skip the next step!)
3.  Insert the code ZHHWMNHQ in the box when checking out
4.  When you order arrives – have fun playing with it 😜
5.  At the end of the month, start stalking the Postman for your handmade Thank You gift from me.

Don’t forget, our new Spring & Summer Catalogue launches on 3rd January and it PACKED with gorgeous products.

Happy Stampin’

Barbara xx

Online Extravaganza

  
Happy Cyber Monday!  And to celebrate, we are giving ALL CUSTOMERS FREE SHIPPING for today only!!
So,If you need to stock up for gifts or for personal shopping, visit my Stampin’ Up! website between 11:00am to 10:59pm on Monday 27 November to take advantage of this chance for a shopping spree with FREE p&p. Remember, with your order of Β£150 or more, you earn yourself some Stampin’ rewards to shop some more, compliments of Stampin’ Up!
Have you got your wish list ready? Click here to go to my Stampin’ Up website.
Happy Stampin’

Barbara x
 

Welcome to the Crafty Inklings’ 5th Blog Hop!

Hi there!  Thanks for dropping by for my project in this 5th Hop.  We are a group of Stampin’ UP! Demonstrators mainly from Norfolk, but I’m privileged to be a Kent Honorary Member of the team along with my Upline, Sarah Keerie.

This month’s theme is ‘Deck The Halls’, in honour of our latest Catalogue and with Christmas rapidly creeping up on us.  My Wish List for this one was rather lengthy πŸ˜‚ and I have been busy making cards for not just Christmas, but other occasions to show how versatile these sets can be.

I’ve chosen to show you a selection of cards using the Painted Autumn Suite, which can be found on pages 48 & 49 of the Catalogue.    You are probably thinking something along the lines of ‘what on earth do Sunflowers have to do with Christmas?’  Well, this set can be used for occasions all year round, and not just as Sunflowers πŸ˜‰

So here is my first card – the Christmas one, which I CASEd from Ann Lewis.  I did alter the sizes slightly to make the card 4″x6″ (Ann is In Australia, so their paper and card sizes are slightly different to ours here in the UK).


I used Tranquil Tide and Emerald Envy Inks for the petal layers, and Real Red Ink for the centres.  Any white areas were covered by using the ‘nut’ part of the Acorns with Early Espresso Ink.  The ’tis the Season’ stamp comes from the special Host Promotion Set – Merry Patterns – which is included free for the Host in all orders over Β£250 placed before 31st October 2017, so you still have a couple of weeks to qualify for a set (see my website for full details).  The outline was stamped using Early Espresso Ink, then the pattern added using Real Red Ink.  The base card is made from Real Red Cardstock with a mat layer of Early Espresso Cardstock.

My second card is for a Birthday, and features the stamps as they were originally intended – Sunflowers.  My thanks to to JanB for the inspiration for this card.


For this card I used Crushed Curry and Cajun Craze Inks for the two layers of petals, then Early Espresso Ink for the centres, including the little dots.  The leaves were stamped with Pear Pizzazz Ink as the main layer and Old Olive Ink for the detail.  

To finish off I used the Happy Birthday Stamp for the Guy Greetings Set and arranged all the pieces on a mat layer stamped using the Marbled Background Stamp and Smoky Slate Ink which I stamped off to give a lighter impression.  As a final flourish, I added a length of Burlap Ribbon across the centre of the Marbled Mat, and some Pearl Jewels on the centres of the sunflowers and on the sentiment.


I wasn’t too sure about this card when I first made it, but the more I look at it, the more it grows on me.

This watercolour technique I CASEd from Billie Moan adding in a Watercolour Smooshed Background which can be found all over YouTube πŸ˜‰

I used Powder Pink, Blushing Bride and Real Red Inks for the background, and the same colours for the flowers as the second card.  These were applied to a piece of wet Watercolour Paper, and spritzed again after stamping to aid the running of the colours.  Being impatient, I dried the whole thing using my Heat Tool, added a length of Gold Natural Trim and a bow then matted it onto a piece of Blushing Bride Cardstock and then a 6″x4″ card base made from Very Vanilla Thick Cardstock.

My final card is a little different 😜


I’m afraid I can’t credit this little guy to anyone, as he appears to have run off my Pinterest Board πŸ™„, so if I’ve CASEd your Hedgehog, please leave a comment so people know where my inspiration came from as it’s seriously cute!

I stamped the petal layers in Crumb Cake and Chocolate Chip Inks, then the middle in stamped off Chocolate Chip.  The face came from the Foxy Friends Set and I drew in the ears and feet with an Early Espresso Stampin’ Write Marker.  The background trees also came from the Foxy Friends set using Pear Pizzazz and Old Olive Inks, and the rest of the colours were applied as a watercolour wash using (top to bottom) So Saffron, Soft Sky, Pear Pizzazz and Crumb Cake Inks and an Aqua Painter which I LOVE!!

On the close up photo you can really see the detail of the petals – I really enjoy playing with this set, and Im looking forward to trying out more animals πŸ€”

I hope you’ve enjoyed your visit – I’ve made loads more cards using products from the Autumn/Winter Catalogue, so subscribe to follow my blog at the top of the page so you don’t miss the updates.

If you like to have a go at making some of these for yourself, you can buy the supplies used from my 24/7 Online Shop.

One last thing before you hop on over to Sandra’s Blog, I’d love to hear your comments 😘

Happy Stampin’

Babs xx

I’m going to say the ‘C’ word!!!

I know it’s only August, but for us card makers, Christmas is a very busy season so we have to start early.
And what better way to kick off those Crimbo projects than having a thumb through the new STAMPIN’ UP! AUTUMN & WINTER CATALOGUE with a cup of something hot (your choice) and some biscuits!

‘How can I get my hands on a copy?’ I hear you cry!!  Easy!  Just send me a message with your name and address and I’ll pop one in the post to you TOTALLY FREE!  Or if you are more techno minded, you can view a copy on my website 😜


Happy Stampin’

Babs xx

The Crafty Inklings 3rd Blog Hop

Yep – it’s that time again!  Are you like me, and love going on a blog hop?  I love seeing what other people come up with using the same products I have, and I often get inspiration from them, or even CASE (Copy And Share Everything) exactly as the original design.  Here at Stampin’ UP! we positively encourage CASEing projects – just don’t forget to give the original designer credit if you publish it anywhere.

I have great pleasure, once again, in being a part of the Crafty Inklings Blog Hop.  You may have come to me from the lovely Tanya’s Blog with her gorgeous projects.  However, if you have come to me first, then let me introduce you to our theme – The 2017-2018 Annual Catalogue!  Yep, it’s a very broad theme this time round – basically, if it’s in the new Catalogue, then it was fair game.

So, after staring at all of my new stamp sets, as well as my carry over sets, I gave in and put all of the names into a hat (or rather a bowl) and chose one set ….  Seaside Shore (Wood Mount 141622, Clear Mount 141625).  This is a carry over set which I’ve used a few times before, but not really put it through its paces properly.  So, I decided to give you a range of project ideas aimed at all crafting abilities from beginner up to avid crafter.

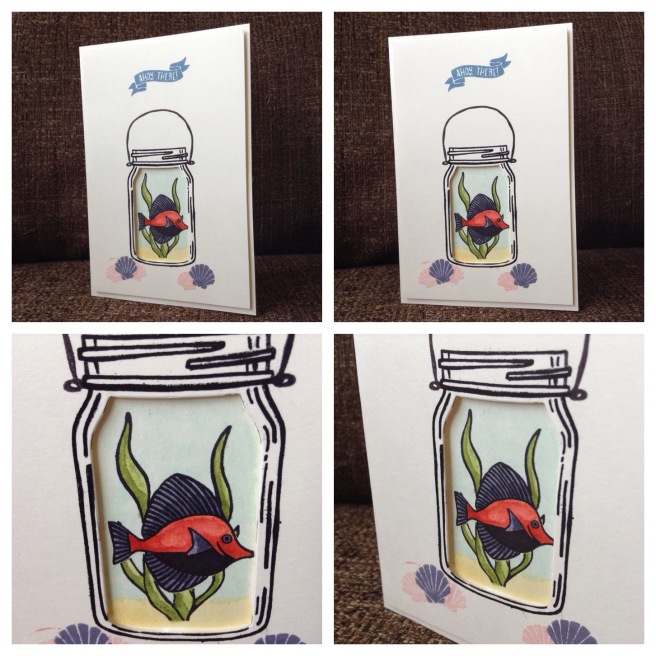
Starting with the basic, I made a sweet but simple card using just the Stamp Set, plus Blushing Bride,Calypso Coral, Pear Pizzazz, Pool Party, So Saffron & Wisteria Wonder Classic Ink Pads, Basic Black Archival Ink Pad, Very Vanilla thick Cardstock, 8 Stampin’ Dimensionals and a Very Vanilla C6 Envelope (see the end of this post for item numbers).  I used the inks and an Aqua Painter to watercolour the stamped images but you could also use a Blender Pen.  Check out the envelope – who says all that cuteness has to stay on the card πŸ˜‰

First I stamped the shells and starfish, using the sticky part of some Post It type notes to make masks so they could overlap.  Then, keeping the masks on, I stamped the two clumps of seaweed using the Archival ink, then the two fish.  I then used the inks and Aqua Painter to watercolour the images (little tip – make sure the black ink is dry first – Archival Ink takes a bit longer to dry than the Classic Ink).  I stamped the ‘Ahoy There” Banner in Pool Party on a scrap of Very Vanilla Card then fussy cut it with my Snips and mounted it using Dimensionals. 

The Watercoloured images were carried over to the inside of the card and the front of the envelope.  (Another tip – remember to check the edges of your stamp to make sure there has not been any transfer of ink there before stamping, otherwise you will get marks where you don’t want them, like I have inside the card 😳)

  
My second card is a little more involved.  As well as the items above, I used the large jar from the Jar of Love Stamp Set which I stamped onto Very Vanilla Thick Cardstock with the Basic Black Archival Ink, and then cut out the centre using the Everyday Jars Framelits.  I then stamped the shells at the bottom of the jar in Pink Pirouette and Wisteria Wonder and the ‘Ahoy There!” banner in Marina Mist. I then used the frame to lightly mark the edges of the frame onto the card blank in pencil so I knew where to stamp the fish and seaweed, then I meant to stick a piece of Window Sheet behind the frame, but I forgot – oops!  

After stamping and water colouring the fishy scene,  I mounted the framed piece of Cardstock onto the card base using Stampin Dimensionals.  As this isn’t a shaker card, there was no need to edge the back of the frame with foam strips, but if you wanted to turn this into a Shaker Card, then you could totally do this!

  
My third card is the most complex but although there is a lot to it, it isn’t actually that difficult.  It’s just time consuming, and does need a fairly accurate hand with the Stampin’ Trimmer.  

As the matching paper to the Seaside Shore Stamp Set has retired, I used the Pool Party Spotty Sheet from the Delightful Daisy Designer Series Paper, and stamped some Very Vanilla Cardstock with the Starfish and Bubbles from the stamp set as the second patterned design (copying a design from the old DSP).  The scenes on the two front panels, the inside square panel, and the back message panel were all stamped with Basic Black Archival Ink and then Watercoloured with the Classic Stampin’ Ink Pads and Aqua Painter.  The background was given a Watercolour Wash in So Saffron and Pool Party for the sand and water. 

I plan to make a video (my first) showing how to make this card, so watch this space!


I then turned to Gift Packaging for my final two projects.  

The first is a simple bag made using the Mini Treat Bag Thinlits and the same patterned sheet from the Delightful Daisy DSP.  The tag is just under  2″ wide, with the top cut using the Scalloped Tag Topper Punch and the length trimmed to 3″.  It has been stamped with a small scene and water coloured as above with a length of 1/4″ Natural Trim threaded through the slit which was then tied with Linen Thread.  The tag was attached with three Mini Glue Dots across the back at the top.


The second is a box made using the Window Box Thinlits.  I do love this box and can see it being one of my ‘go to’ packaging tools for a long time to come.  This time I made a ‘Porthole’ using two dies from the Circle Layering Thinlits and Copper Foil Sheet.  I backed this with Window Sheet and stuck it over the top of the scene, which was stamped onto a circle of Very Vanilla Card, with Stampin’ Dimensionals. The small squares on the sides are cut using the Stitched Shapes Framelits.  Once decorated, I then glued the box together using Multipurpose Liquid Glue.  (I’ll get a video done for this as well, asap).


Of course – if you are going to use the Thinlits and Framelits, you will need a Big Shot or similar die cutting machine.

I hope you like my projects, and that they have inspired you to take another look at the Carry Over stamp sets when you make your 2017-2018 Wish List.

Well, it’s time now to hop on over to Sue’s Blog to see what wonderful creations she has to show you!

Just before you leave me – if you don’t already have a Stampin’ UP! Demonstrator and would like to buy the supplies needed for any of my projects, I would love to help you.  You can find my 24/7 Shop Here and the list of supplies I used is below πŸ˜‰

Happy Stampin’

Babs X

Supplies List:-

Stamp Sets

Seaside Shore – wood mount 141622 ; clear mount 141625

Jar of Love – photopolymer 141587

Butterfly Basics – wood mount 138813 ; clear mount 138816 ; photopolymer 137154

New Eastern Beauty – photopolymer 143675
Cardstock & Designer Series Paper

New 12″x12″ Cardstock Pack – Subtles Best (8 each of Blushing Bride, Pear Pizzazz, & Soft Sky) 145408

New Delightful Daisy Designer Series Paper – 144137

Paper Basics

New A4 Thick Cardstock – Very Vanilla – 144238

Foil Sheets – Copper – 142020

Window Sheets – 142314

Envelopes – Very Vanilla (C6) – 106589


Inks

Archival Stampin’ Ink – Basic Black – 140931

Classic Stampin’ Pad –

  • Blushing Bride – 131287
  • Calypso Bride – 124392
  • Marina Mist – 121682
  • Pear Pizzazz – 131290
  • Pink Pirouette – 116203
  • Pool Party – 124391
  • So Saffron – 108611
  • Soft Sky – 131292
  • Wisteria Wonder – 124389

OR – you could buy the Subtles Assortment – 131185 – one of each of the 10 Subtles Pads and get the Wild Wasabi as well πŸ˜‰
Alternatively – Watercolor Pencils 141709 (although the colours are restricted, and you would still want the Soft Sky and So Saffron pads to do the washes.


Ribbon & Trim

1/4″ (6.4mm) Natural Trim – Gold – 141484

Linen Thread – 104199


Tools

Aqua Painters – 103954 OR Blender Pens – 102845

Stampin’ Trimmer – 129722

Bone Folder – 102300

Scalloped Tag Topper Punch – 133324

Paper Snips – 103579

Big Shot Die Cutting Machine – 143263

Everyday Jars Framelits – 141490

Mini Treat Bag Thinlits – 137547

Window Box Thinlits – 142762

Layering Circles Framelits – 141705

Stitched Shapes Framelits – 145372


Adhesives

Multipurpose Liquid Glue – 110755

Tear & Tape Adhesive – 138995

Mini Glue Dots – 103683

Stampin’ Dimensionals – 104430

It’s Arrived!!!! Yayyy!

I love this time of the Stampin’ UP! Year!  The new Annual Catalogue 2017-2018 went live this morning – have you had a look yet?

It has an amazing 233 pages packed with goodies, with some returning but best of all, ALL THOSE NEW PRODUCTS!!!

I’ve just counted them!  Are you ready for this?  We have …

  • 4 New Kits each of which also has a refill pack
  • 82 New Stamp Sets including 5 New Background Stamps
  • 23 New Bundles – a stamp set and either a set of dies or a punch, with a combined saving of 10%.  These are great deals!
  • 19 New Die Sets for the Big-Shot
  • 7 New Punches
  • 15 New Paper Sets
  • 50 New Spools of Ribbon or Trim

And that’s not counting the embellishments, the ink and Cardstock for the 5 new In Colors or our New ‘Memories & More’ range of memory keeping products.

Wow!  When you look at it like that, what’s not to like??

Over the next couple of weeks I’ll be sharing some ideas I’ve come up with using some of the new products, so keep an eye out here on my blog and on my Facebook Page.  Why not subscribe to both, and request my Newsletter by going to my Stampin’ Up Website so you don’t miss out on any of the announcements.

I’m really looking forwards to this coming year – Happy Stampin’! 

The Crafty Inklings April Blog Hop – Stampin’ UP! Spring & Summer 2017

Welcome to our second Blog Hop which focuses on products from the Spring & Summer 2017 Catalogue.  

What did you think of Tanya’s offering?  Gorgeous huh?

My projects are all made using the Basket Bunch Bundle, which is a great set which can be used all year round, not just at Easter.
This Bundle includes a Set of 29 Photopolymer Stamps and 22 Dies for Β£42.25 – a saving of 10% when you buy he two together.
Here are three designs I came up with for the hop – I’ll be adding some more designs between now and Easter for added inspiration.


I hope my designs have helped to whet your appetite for this Bundle.
If you started with Michelle, then you’ve come to the end of the tour – if not, then your next stop on the hop is with Michelle Bryant xxx
PS – if you would like to make these cards for yourself, take a look at my 24/7 Stampin’ UP! shop.  If making your own is not your thing, then you can buy these and many other cards and gift packages through my Studio@316 Facebook Page.

The Crafty Inklings Blog Hop

Hi guys – oops!!  It’s been a LOOONG time since I last posted!  But I’m back!
So – welcome to our first Crafty Inklings Blog Hop. We are a group of fellow Stampin’ Up Demonstrators from Norfolk, Suffolk and some of our wider teams, a bit further afield !  

You have probably joined me from Jacqui Lawrence’s Blog –  did you love her projects?  If you’ve jumped straight in with my blog, then Let me tell you a bit about it.

Today we are sharing projects we have made from the Spring / Summer and Sale-A-Bration Catalogues.  If you haven’t seen them, you really do need to have a look at your Demonstrator’s website – if you haven’t got a Demonstrator, then please feel free to take a look at mine πŸ˜‰

I want to show you the gorgeous Sending Love Suite.  It’s not just for Valentine’s Day!
  

I think I’ve managed to use every stamp from the Sealed With Love stamp set plus every die from the Love Notes Framelits Dies – I’ve even slipped in a little of each design from the Sending Love Designer Series Paper Stack and the Sending Love Glassine Sheets.  Imagine each one of those squares on a 4″ x 4″ card – they would make lovely little notelets – add in a box and you have a beautiful gift set.
  
Here are a few other ideas to prompt your mojo!  I made the Cards with two inserts – one for Valentine’s Day and one plain – each with  Tear and Tape Adhesive on the back so either one can be stuck in by the customer.

Thanks for dropping in πŸ˜‰.  I’d love to know what you think of my frame and cards, so please feel free to leave some love in the comments 😘

It’s now time to visit Rebecca Davis 

See you again soon

Babs xxx

It’s that time again!

Yes, we are saying goodbye to our retiring products for 2016 πŸ˜₯. Some, I will personally be keeping as I am soooo in love with them, and am genuinely sad to see them go, but without retiring stuff, Stampin’ UP! can’t fit in all the gorgeous yumminess of crafting coming our way on 1st June.

When you first see the list, you may be shocked at some of the items leaving, but when you see what is coming (don’t worry – time will fly) you will understand.

Meantime, get your hands on your favourites from the retiring list before they sell out – the sooner you place your order, the greater the chance of them being in stock.  Remember – when they are gone, they are gone FOREVER 😞.

Over the next few weeks I’ll be showing you some projects I’ve made with a selection of the retiring products, and giving you updates on how stocks are going, so be sure to add me to your reading list πŸ˜‰

REMEMBER – to buy any of the retiring Hostess Sets, you need an order of Β£150 or over in conmmissionable sales (not including postage).  If that value is a bit too much for you, why not become a Virtual Hostess – drop me an email or give me a call for more information if you are interested.

 Check out the Retiring Products HERE!


New 2015-2016 Annual Catalogue plus Joining Offer

Morning all!

Well, it was always going to be a late-to-bed night tonight – how could I NOT stay up poised over my iPad ready to submit my first order from the new Stampin’ UP! Annual Catalogue?  And boy, it’s a corker!!!

I’ll do a ‘tour’ of the catalogue later (when my head is not quite so foggy from tiredness lol) but I just wanted to pop on and give you all the link to the online shop and also let you know about our fab new joining offer for anyone who is thinking of joining my team.

All new Demonstrators who join between the 2nd and 30th June 2015 will be able to pick an EXTRA TWO STAMP SETS OF THEIR OWN CHOICE FOR FREE!  That’s in addition to all the normal benefits of being a Demonstrator.  Check out the details at CHECK OUT THE DETAILS HERE or give me a call.

And that link to the catalogue is http://www.magiclady.stampinup.net – if you place an order which is under Β£150, please consider using the CURRENT HOSTESS CODE: VGC9YGAB to help me cover the costs of the products used in my tutorials.  If your order is over Β£150 then don’t use the code as you become the Hostess πŸ˜‰

Well – I’m off to bed now but I’ll catch up with you all VERY SOON!

Xxxx